In the future, once I am done with the projects I am currently working on, I would like to work on some other patterns. I think that making socks would be really cool, but I’ve been told that the heel is really hard to do. Also, in order for the socks to be useful I would need to use a very thin yarn which would then take a long time to knit up.
I think something like this “Cool Mist” sock pattern from Ravelry would be really great to do someday. I know that there are other skills needed for this type of knitting, such as knitting in the round, where you knit with 4 needles instead of two.
Also, I would like to try hats and mitts sometime as well. I know that there are some patterns out there that are not too difficult. That might be a good project to tackle next.
My mother refuses to listen to me when I want to tell her about my knitting project because she thinks that it is too feminine and so she doesn’t care about it. She thinks that because in the recent past it has been an activity mainly done by women, it is anti-feminist. However, I, and many other people, think that knitting is a feminist activity.
As I mentioned in a previous blog, centuries ago knitting was well respected and there were prestigious knitters guilds comprised entirely of men. It only became less prestigious and well respected when it was done domestically by women. The issue is not women knitting, it’s the way the world sees women labor. I think this is true for a lot of women dominated activities/ professions.
Knitting is cool and useful. You can make entire garments out of fibers. It’s a way of artistic expression and it’s also practical. Why would I not do something I like just because it was something that women were expected to do in the past?
Knitting is one of many fiber arts that have been practiced for centuries. Knitting is thought to have originated in the fifth century in the middle east. There are other methods of creating fabrics with yarns that predated knitting such as nalebinding. Knitting has remained popular to the present day (Ross, 2017). There are many different styles of knitting that originated in different regions of the world.
Beginning in the 14th century, knitting guilds were established that were entirely made up of men and they focused on creating and selling knitted goods of very good quality. These guilds were very prestigious and took many years of training to join (The Crafty Gentleman, 2015).
By the 16th century, knitting machines were created which meant that not all knitting needed to be done by hand (Ross, 2017). Knitting production increased.
During wars, knitting was often seen as a patriotic activity. For example, during the Revolutionary War, American women knit clothing to avoid having to buy British goods (Makers Mercantile, n.d.).
References.
Makers Mercantile. n.d. A History of Knitting: A resource demystifying the origins of knitting. https://www.makersmercantile.com/history-of-knitting-a-resource-guide.htm.
Ross. 2017. What is knitting? A brief history of knitting and its uses. https://www.the-sustainable-fashion-collective.com/2017/05/04/knitting-brief-history-knitting-uses.
The Crafty Gentleman. 2015. The History of Knitting: the history of knitting guilds. https://www.thecraftygentleman.net/2015/08/16/history-of-knitting-guilds/.
Not very much has changed in the last week. I’ve been busy and haven’t worked on my project very much. Also, I’m getting to the wider parts now, so progress is very slow. I think I have well over a hundred live stitches by now. I add 2-4 stitches on each row and I’ve done lots of rows. I’m still on my second ball of yarn though, so I still have a lot of work before I’m done. I’d really like to be done this fall/winter so I don’t have to wait till next year to wear it.
Right now the middle of the shawl is about 12 inches long and it needs to be about 16 before I can add on the second colour. I’m wondering if I will end up with extra yarn at the end. If so I think I will make a pair of mitts for my dad for Christmas. They should be nice and warm in wool and with the thick yarn, I think it will come together quickly.
This week I came to the end of my first ball of yarn. I still have 3-4 of my main colour and 1-2 of my secondary color left. Considering how much yarn I have left to add it seems like my shawl is pretty big. I wonder if this is just an illusion since I’ve started on the narrow side or if I will end up requiring less yarn because I chose a different brand.
There are many different ways to join yarn, especially when using wool. In the past, I have just made little knots but these show up in the final project and I wanted something a bit cleaner this time. In the end, I chose spit splicing.
Spit splicing is where you take the ends of both balls of yarns and overlap them by a few inches so they create one continuous string. You add a bit of water (or spit) to your hands and then quickly roll the yarn ends between your hands. Keep adding water and rolling until the yarn felts together. It didn’t take very long before the splice was very strong. I pulled as hard as I could and it wouldn’t come apart.
This process demonstrates why you shouldn’t put wool in hot water in the washer. It will felt together and ruin your item. It should be washed gently by hand instead.
While I made quite a bit of progress last week, I decided that I needed to start over. It was hard to tell at first because the fabric was being supported by the needles and the wires, but as I got further along and the fabric was able to hang loose off of the needles I realised that the fabric I was creating was too loose. The pattern specified that the shawl should be made of a firm fabric and I agree. A tighter firmer fabric will be warmer, keep its shape better, and when it’s finished will look closer to what I envisioned.
There are two possibilities for why my fabric was too loose: tension and needle size. I was pretty sure that my tension wasn’t the issue because my knitting tends to be quite tight. I thought that the issue was likely the needles I was using.
While I was using the needle size the pattern suggested, I forgot to take into account the fact that I had substituted the yarn. I had assumed that the yarns would be similar enough since they were both the same weight but it seems that there was enough of a difference to show up in the tightness of my fabric. I ended up going back to the store to buy smaller pair of needles. Working with thinner yarn and smaller needles might mean I need more yarn than the pattern calls for. Luckily the worker at the shop told me about their program where if you buy yarn and don’t end up using it in your project you can return it up to 4 months later. I bought an extra ball because I was scared up running out. Since the yarn is dyed in lots, it is possible that the same yarn bought at different times will have slightly colour.
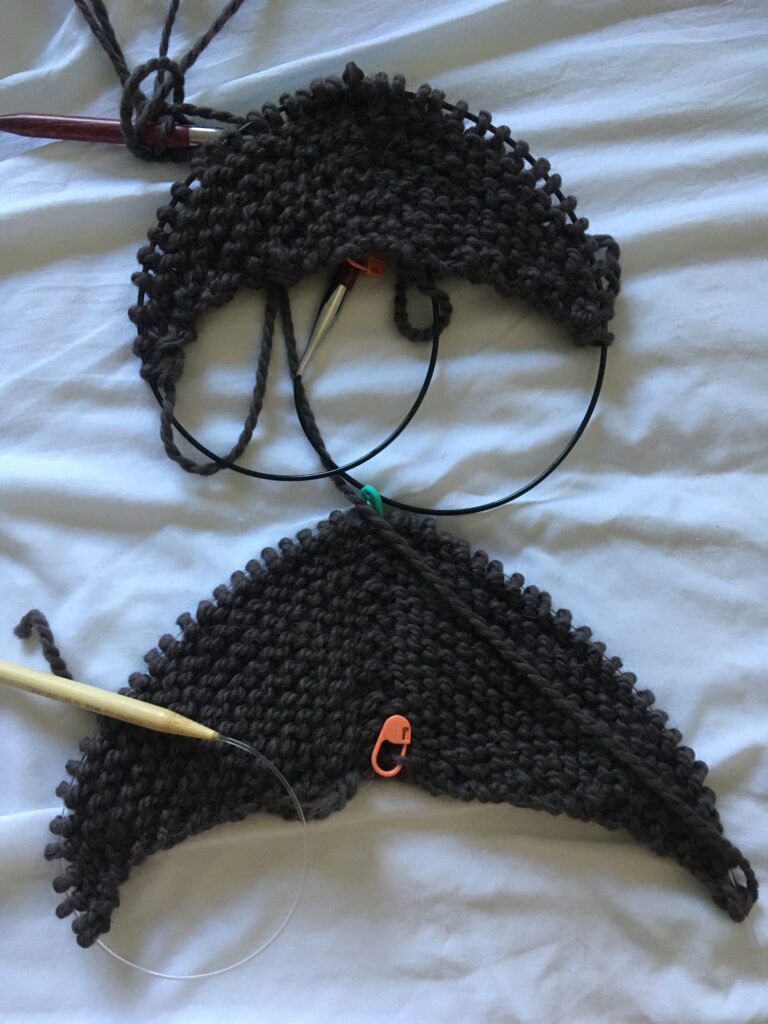
Once I bought the new needles I had to undo everything and start over. It was hard to undo all of my work but after redoing it and seeing the results of the new needles I think it was for the best. Here is a photo with the old needles on the top and the new needles on the bottom. It’s a bit hard to see the difference in the photo but when you see it in person or touch it the difference is pretty clear. The fabric is still a bit looser than I would like but I think I will stick with this.
Shawl with the larger needles on the top and the smaller needles on the bottom.
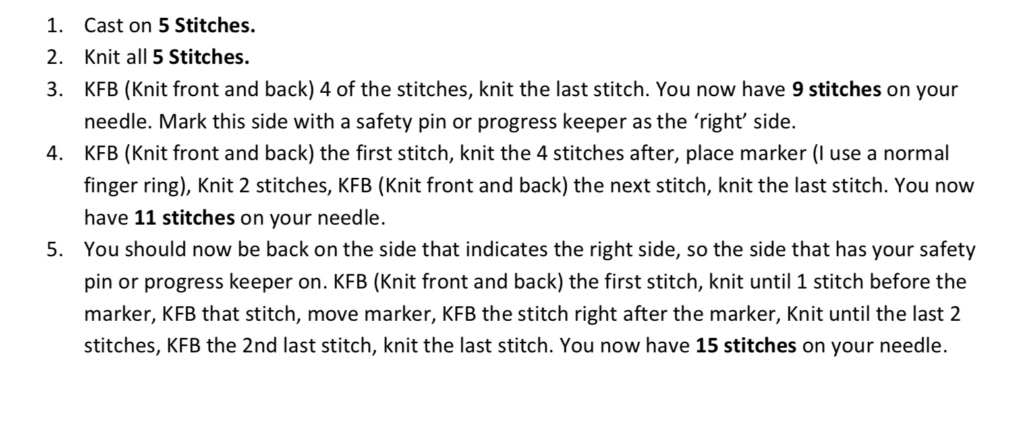
After buying all of my materials last week I was ready to start my project. The first step was reading the pattern. This was a pattern made for beginners which meant that most of the steps were written out in full sentences instead of in the code that most knitting patterns are written in.
The first few steps of the pattern I chose.
There were a few stitches in the pattern that I had never done before as well as some that I hadn’t done in a while. I started using the TikTok tutorials that the designer of this pattern had created but found that she moved a little bit too quickly for me to follow. I ended up watching some slower pace youtube tutorials instead. These tutorials really broke down the steps and were very easy to follow. One of the youtube tutorials I used is embedded below.
A screenshot of one of the designer’s TikTok tutorials.
Interestingly, I found out that I had been doing one of the basic stitches wrong in a previous project. I fixed the problem and I am interested to see if I will notice a difference in the final product after making this change.
One of the stitches was called knit front and back. This is a stitch that is meant to increase the number of stitches on your needles because you will do two knit stitches on a single loop. This will allow your shawl to take on the triangle shape.
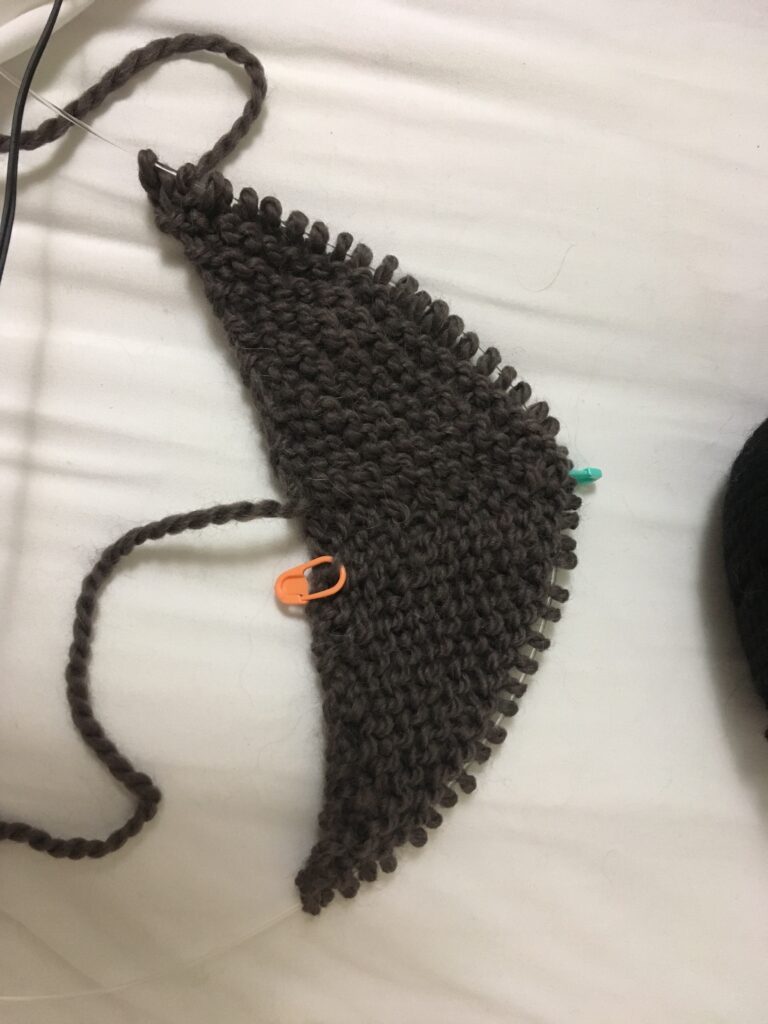
Once I had figured out the pattern and the stitches I began knitting. This video shows my progress after about an hour and a half.
My progress after about an hour and a half.
In the beginning, my progress was very fast. The shawl grew quickly because the rows were very short. However, I added 2-4 stitches to each row which meant that each row got longer and took longer to knit.
The shawl started in the middle of the flat row where the string is poking out. I am adding more stitches along the curved side. You can see the wire that connects the needs threaded through the loops on that side.
Something that took some getting used to was working on circular needles. These are needles that are connected together by a wire. At first, they were a bit awkward because I was not used to them and the wires kept getting in the way. I eventually got the hang of them.